DIY foundation crack repair is a viable solution for homeowners tackling minor issues. This comprehensive guide provides actionable steps and expert advice to effectively address these often-overlooked problems. Many homeowners face the daunting task of dealing with foundation cracks, but understanding their causes and taking proactive measures can make a difference in preventing further damage. This guide clarifies the process and provides practical tips and steps to help you take control of minor foundation crack repairs. We’ll explore various methods and materials, offering insight into determining the severity of the crack and implementing the best approach for your situation. The following sections will cover everything from initial inspection to final sealing.
Identifying and Assessing Minor Cracks
Understanding the Severity
Before diving into DIY foundation crack repair, it’s crucial to assess the situation and determine if the issue is minor enough for you to handle. A small crack can often be repaired successfully with DIY methods, while a larger or more complex crack may require professional intervention to prevent further damage. This early assessment will help you focus on the appropriate methods and avoid jeopardizing the structural integrity of your home.
Visual Inspection
Thorough visual inspection plays a pivotal role in assessing the extent of the problem. Check the crack’s depth, width, and length, noting any expansion or signs of continued damage. Inspect the surrounding area for any additional signs of distress, such as signs of water intrusion. This careful observation will guide your selection of appropriate repair techniques and prevent costly mistakes. Consider a photograph or video of the crack as a record of its condition before you start any repairs. This will assist with any future assessment.
Preparing for the Repair Process
Gathering Necessary Tools and Materials
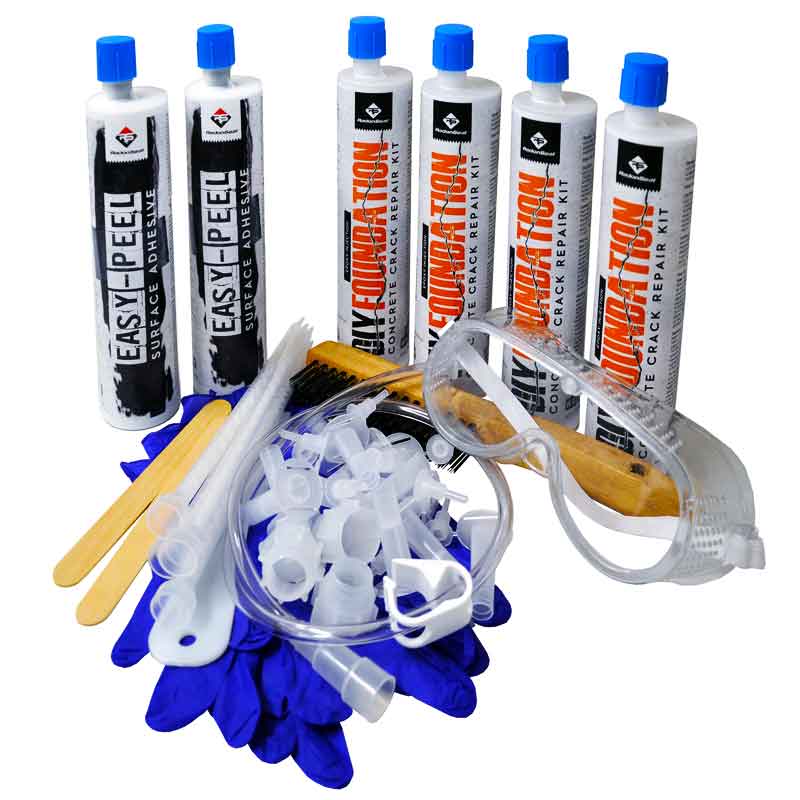
Before starting the repair process, ensure you have the necessary tools and materials to complete the job efficiently. Gather tools such as a hammer, putty knife, and measuring tape. The materials required will vary depending on the severity of the crack. For minor cracks, patching compounds, concrete sealant, and reinforcing mesh are essential materials. Always double-check the measurements to ensure precision during the repair process, ensuring accurate placement of materials and avoiding costly errors. A well-stocked toolbox will ensure a smoother repair process.
Cleaning the Affected Area
Thoroughly clean the area surrounding the crack to remove any loose debris, dust, or other contaminants. This step is crucial as it will enable proper adhesion of the patching compound and sealant. Ensuring a clean surface will significantly enhance the repair’s efficacy, improving the longevity of the fix. Use a brush, a vacuum, and cleaning agents to efficiently clean any dirt, dust, or debris from the crack area.
Applying the Repair Compound
Choosing the Right Compound
Selecting the appropriate repair compound is crucial for a lasting fix. The choice of compound depends on the size and depth of the crack. Consider factors such as the consistency of the compound and whether it requires additional reinforcement. Consult product labels for specific instructions on mixing ratios and application techniques. Using the correct type of compound prevents the repair from failing over time and ensures a sturdy solution.
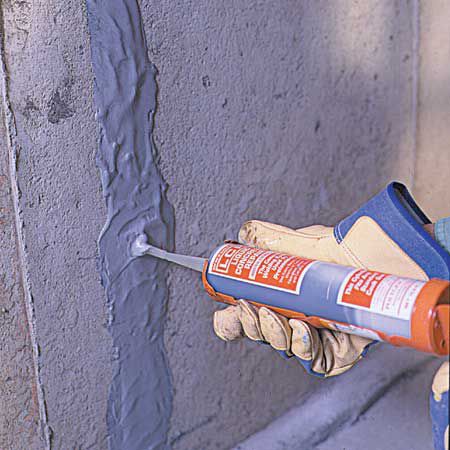
Applying the Compound
Apply the patching compound to the crack using a putty knife, ensuring a smooth and even layer. This step often requires multiple applications to achieve a complete and even fill. Carefully apply the compound without applying too much pressure. Allow the compound to cure completely following the manufacturer’s instructions, respecting the drying time needed for proper adhesion and strength.
Sealing and Finishing
Sealing the Crack
Applying sealant to the repaired area is essential for providing a waterproof barrier. Choosing the right sealant is critical for both moisture resistance and proper aesthetics. Select a sealant appropriate for outdoor or indoor use, depending on the location of the crack. Ensure the sealant is compatible with the patching compound to prevent issues later on. Apply the sealant in a smooth, even layer to cover the entire repair area. Consider the sealant’s curing time and follow instructions carefully.
Final Inspection
A final inspection of the repaired area will be necessary to ensure the repair process was carried out correctly. Carefully assess the integrity of the sealant and ensure the patch has properly adhered. A final check allows for identification of any issues or areas that may require further attention. This will determine whether the repair has been successfully performed or further steps are necessary for a proper and lasting solution.
Prevention Measures
Understanding the Causes
Recognizing the factors contributing to foundation cracks allows for proactive measures to prevent future damage. Understanding the unique factors impacting your house, such as soil composition and drainage patterns, is a useful step in identifying risk areas. Identifying possible problem areas in the house through these inspections will help to prevent potential damage to the house’s foundation.
Regular Inspections
Routine inspections of the foundation are crucial for early detection of potential issues. Regularly checking for any signs of cracks or other damage is essential for maintaining the structural integrity of your home’s foundation. Identifying and addressing problems early will prevent future damage and save money in the long run. Proactive measures can save substantial costs and repairs over time.
Addressing Underlying Issues
Addressing any underlying issues affecting the foundation is a key preventative measure. Problems such as drainage issues, poor soil conditions, or tree roots near the foundation should be addressed in order to reduce the risk of structural issues. Repairing drainage problems and maintaining proper vegetation near the foundation will reduce the risk of moisture-related problems.
Additional Considerations
Professional Consultation
Despite proper research and preparation, some cases may require expert advice. If you encounter issues or doubt your ability to handle the repair effectively, consulting a professional contractor is strongly advised. They can assess the situation and provide tailored solutions for a comprehensive and lasting result. This professional evaluation will help ensure a long-term solution and will help you prevent any serious problems in the future.
Additional Materials
Depending on the specific type of foundation crack or environmental factors, additional materials may be required to reinforce the repair process. Consult resources and professional advice for solutions specific to your needs. Consult relevant resources, such as manufacturers’ instructions or local building codes, for specific recommendations. For the best possible outcome, be sure to follow the recommendations closely.
DIY Foundation Crack Repair: Expert Tips and Considerations
Choosing the Right Tools and Materials
Careful selection of tools and materials is a critical component of a successful DIY foundation crack repair process. Make sure that all materials are suitable for the specific type of foundation crack and that there are no incompatibilities. Consider the conditions of the environment in which you will be applying the repairs. Choose high-quality materials and tools for a lasting repair.
Understanding the Foundation
It is important to have a thorough understanding of your home’s foundation type. Depending on the material and construction method, specific repair methods will be more effective. Consulting an experienced contractor about the foundation type is crucial to finding a solution that suits your needs.
Safety First
Prioritize safety throughout the repair process. Always wear appropriate safety equipment, and ensure sufficient ventilation when working with compounds or sealants. Taking preventative measures from the start is crucial for ensuring an easy and effective repair process.
Case Studies and Success Stories
Successful DIY Repairs
Numerous homeowners have successfully repaired minor foundation cracks using DIY methods. These stories highlight the effectiveness of this approach for addressing common issues. Careful research and adherence to instructions are key components for ensuring a successful outcome. For an effective repair, research the specific type of crack and the right repair method.
Addressing Soil Conditions
Understanding the specific issues caused by soil movement and drainage will give you an edge in ensuring a long-term solution. Address issues proactively for lasting effects.
Proper Measurement and Application
Proper measurement and application of materials are crucial for a lasting and successful repair. Make sure that the material is evenly distributed for a better outcome.
Frequently Asked Questions
What are the common causes of foundation cracks?
Foundation cracks can stem from various factors, including soil settlement, moisture fluctuations, uneven ground, or even the settling of the house itself. Poor drainage, tree roots growing near the foundation, changes in water levels due to heavy rainfall, or inadequate foundation design can all lead to cracks. In extreme cases, geological shifts can also be a cause. The specific cause usually depends on the age, construction, and local environmental conditions of the home. Understanding the possible causes helps to address the problem effectively and to prevent future damage.
How can I tell if a foundation crack is minor?
Identifying minor foundation cracks from more serious ones is vital for determining whether DIY repair is appropriate. A minor crack typically exhibits a hairline fissure, is relatively shallow, and doesn’t visibly affect the structural integrity of the foundation. It’s crucial to inspect the crack carefully, looking for any signs of expansion or worsening condition. If you’re unsure, it’s wise to seek professional assessment by a qualified contractor to rule out structural risks and to determine the best course of action.
What tools and materials do I need for DIY foundation crack repair?
The necessary tools and materials for DIY foundation crack repair usually include a variety of items. These include a hammer, screwdriver, measuring tape, putty knife, and strong adhesive. Specific needs depend on the size and type of the crack. Materials like patching compound, concrete sealant, and reinforcing mesh, are commonly needed for minor repairs.
Are there any safety precautions to take during the repair process?
Safety precautions should be prioritized in any repair process, especially when working with foundation repair. Wear appropriate safety equipment like work gloves, eye protection, and sturdy shoes. Be extremely careful when handling any tools and materials, ensuring proper ventilation during application of compounds and sealants, and take necessary precautions to avoid falls. If using power tools, follow manufacturer’s instructions carefully. Always consult safety data sheets for handling any materials or tools for specific precautions.
In conclusion, DIY foundation crack repair is a manageable project for homeowners with a little know-how and the right tools. By following these steps and understanding the nuances of your specific situation, you can effectively address minor foundation cracks and maintain a sturdy home. Remember to prioritize safety and seek professional help if the damage appears extensive or beyond your skillset. Contact a qualified contractor for more extensive foundation repairs, especially if you are unsure about the cause of the cracks or the structural integrity of your home. Let’s now turn to frequently asked questions to further clarify the process.